Training, resources, and everything you need to fight needle phobia and cope with pain using Buzzy
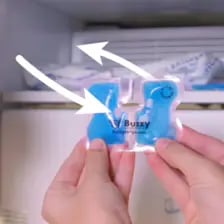
For best pain relief, the wings must be frozen solid to avoid absorbing vibration. Wings will stay frozen for about 10 minutes at room temperature.
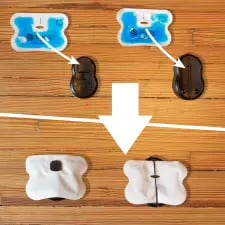
For the Mini, place the hole in the ice wings over the hook on the back of Buzzy. For the personal, slide the ice wings through the elastic strap on the back.
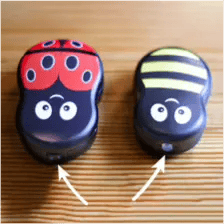
Once being held in place either by a strap, tourniquet, or by hand, press the button or switch on the top of Buzzy. The Buzzy Mini has an automatic shut-off feature after 3 minutes.
For vaccinations, place Buzzy where the arm meets the chest. Hold firmly for 10-30 seconds before the poke. Placement may vary depending on procedure. See the full list of placements below.
Download the guide below to learn more how you can use Buzzy® in the most effective way
Personal products are intended to be used by a single user. The Buzzy® vibration unit can be cleaned with alcohol based sanitation wipes. Do not autoclave. Do not submerse in liquid. Soiled wings should be disposed and replaced.
Buzzy® and healthcare wings are reusable. Wings should be cleaned with alcohol-based cleaning wipes or by following your facility’s infection control protocol for non-critical equipment such as stethoscopes or patient monitors. Buzzy should be cleaned with alcohol-based or chlorhexadine cleaning wipes. Most Sani-cloths contain disinfectants that can make Buzzy prone to cracking after 120+ uses (two battery changes), including: Hydroxides, Dimethyl benzyl, Ethyl ammonium chloride, Ethylenediamines. Do not autoclave. Do not immerse in liquid. Healthcare wings are the only wings that can be disinfected between patients. Soft-sided wings are single patient, and should be left with the patient for reuse or disposed of .
When treating an ache or injury, Buzzy should go directly where it hurts. For intramuscular vaccinations (typical for Flu shots and other vaccinations) Buzzy should be placed in the crook of the shoulder where the arm meets the chest. When doing subcutaneous injections, Buzzy should go directly on the intended needle site, then be moved proximally during the procedure. When using Buzzy for IV access or a blood draw or fingerstick, just place Buzzy proximally immediately prior to and during the procedure. For more details see below.
Place Buzzy in the crook of the shoulder where the arm meets the chest. The patient, a guardian, or clinician can hold the Buzzy in place. This allows the Buzzy to stimulate multiple different dermatomes at once.
To place “proximally” for SC injections means Buzzy needs to go “between the brain and the pain” to be effective. In other words, Buzzy should be placed along the path of the nerve to best interrupt the pain signals’ journey from your skin to the brain. The nerves travel in territories called “dermatomes”. If you’ve ever seen shingles, the very abrupt outlines of the rash come because shingles affects skin by irritating the nerves in one or more dermatomes. This picture shows Buzzy optimally placed to decrease pain at the intersection of the C5 and T1 dermatomes.
To place “proximally” for IVs and during the actual painful procedure (splinter removal, cleaning a wound, injection, IV, etc.) means Buzzy needs to go “between the brain and the pain” to be effective. In other words, Buzzy should be placed along the path of the nerve to best interrupt the pain signals’ journey from your skin to the brain. The nerves travel in territories called “dermatomes”. If you’ve ever seen shingles, the very abrupt outlines of the rash come because shingles affects skin by irritating the nerves in one or more dermatomes. This picture shows Buzzy optimally placed to decrease pain in the C6 dermatome.
Dermatome pathways are fairly straightforward on the hands and arms, as they go straight down from the shoulder. Other places on the body, the regions get a little more complicated. This diagram shows positioning of Buzzy for a procedure on the line between T10 and T11. Imagine the nerves coming out from the spine and wrapping horizontally around the stomach and chest. This Buzzy is in great position for a poke between the bellybutton and Buzzy’s bottom. The skin on the stomach is thinner than the back or upper arm, so Buzzy® may only need to be in place 15-30 seconds before moving and doing the procedure.
This shows where Buzzy would go for an injection on the mid-thigh, for example placement for a Rocephin, Humira, or Enbrel injection. First place Buzzy directly on the intended site to desensitize the area. Leave in place up to 60 seconds as it’s a more muscular area, then move toward the brain/spine a few centimeters up and lateral. Keep Buzzy® vibrating in place while the shot is given. Thighs are a bit tricky, because the dermatomes curve from backside toward the knee. Again, place on the area where the shot will go, but then slide a little toward the hip/spine rather than straight up and down. Buzzy’s motor is at his larger rounded tail end away from the switch, so the bigger rounded end should be closer to the shot, and Buzzy’s “head” should be closer to the actual head or spine. Leave the ice pack in place for this whole process if tolerated: ice is an important part of the pain relief.
For gluteal injections, the nerve pathways are very tilted and fairly narrow. Buzzy XL may be better for this, as it is slightly larger and covers more area. For a gluteal injection in the upper outer quadrant of the buttock, after desensitizing the area 60-90 seconds, Buzzy will be angled and slightly closer to the spine.
Placement of Buzzy for injections in the foot also may be more complicated. In general, imagine the foot divided lengthwise into three stripes, and place Buzzy closer to the leg in the same stripe.
Facial dermatomes come straight from the back of the skull up and over, so Buzzy placement would be directly vertical for Botox or eyebrow procedures. For upper lip or mandible procedures, placement slightly above and lateral would be correct.